Concourse CI Installation and Configuration in Windows
Introduction to Concourse
Concourse is an open source CI/CD system with integration supported to Resource types in the outside world. Concourse's principles reduce the risk of switching to and from Concourse, by encouraging practices that decouple your
project from your CI's little details, and keeping all configuration in declarative files that can be checked into version control.
Install and Configure Concourse in Windows
Follow the below Steps to Install
-
Installing Docker Desktop is pretty simple, download the exe file and install the docker desktop
-
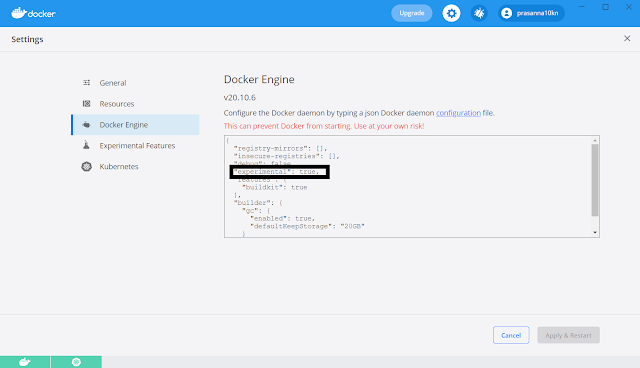
Modify Docker daemon configuration file as below
- Installing Docker Desktop is pretty simple, download the exe file and install the docker desktop
-
Modify Docker daemon configuration file as below

- In PowerShell run below commands
- wget https://raw.githubusercontent.com/starkandwayne/concourse-tutorial/master/docker-compose.yml
-
docker-compose up -d

-
In browser, go to url : http://127.0.0.1:8080/ which will show below login screen

Follow the below step to Configure
- Download Fly CLI from Github, In my case I have copied the fly.exe file in "D:\concourse\installer\" and you can specify any folder.
-
Set the Environment Path for Concourse CI. Go to "Edit System Environment Variables" and click on Environment Variables and add the path where the fly.exe is kept


-
Open PowerShell and run below command to validate fly installation
fly --version
-
Run below command in powershell, you can name with any target name, here I mentioned prasanna
fly --target prasanna login --concourse-url http://127.0.0.1:8080 -u test -p test
-
Create a configuration file in .yml as below and keep it in the working directory
helloworld.yml
---platform: linuximage_resource:type: docker-imagesource:repository: alpinetag: edgerun:path: echoargs: [hello world]

- Execute the file with fly by running below command in powershel
fly -t prasanna execute -c .\helloworld.yml
-
You can also execute a below basic pipeline with set-pipeline command and see the results in concourse UI. Run below command targeting the helloworldpipeline yaml file
fly -t prasanna set-pipeline -c .\helloworldpipeline.yaml -p hello-world---jobs:- name: job-hello-worldpublic: trueplan:- task: hello-worldconfig:platform: linuximage_resource:type: docker-imagesource: {repository: busybox}run:path: echoargs: [hello world!]

Destroy Concourse
Once you're done with the local Concourse deployed with the help of docker-compose up, you can use docker-compose down to destroy it.

Conclusion
I hope this detailed guide helped you understand and install Concourse CI on your Windows Instance. To learn more about Concourse CI, check out the official Concourse documentation.
Hi Prashant, wondering if you can help me with this for concourse. we recently switched to Concourse from Jenkin, and below is what I want to achieve, could you please provide me with your expert guidance.
ReplyDeleteCONTEXT: I want to standardize practices organization wide like security scanning and test tools in pipelines and also standardized thresholds for failing for each of them.
REQUIRMENT: when any development team create a new pipeline for their project I do not want them to choose the static scanning tools or test tools, or set thresholds but rather any new pipeline should automatically honor the tools and thresholds set at organization level for Concourse. is there anyway this can be implemented in concourse?