AWS Route 53 Inbound Resolver to resolve DNS for Multi Account Organization
Amazon Route53 Resolver
The route 53 resolvers are contactable IP addresses (endpoints) where the DNS queries from different sources can be directed. There are two types of resolvers that administrators can deploy.
 Its not feasible to create inbound resolver in each cloud consumers account keeping cost in mind. The proposed design will have one resolver endpoints created in shared services account with 2 ENIs, if you have high
number of incoming queries then you can add additional ENIs to handle the threshold. You can add up to 6 ENIs for an inbound resolver.
Its not feasible to create inbound resolver in each cloud consumers account keeping cost in mind. The proposed design will have one resolver endpoints created in shared services account with 2 ENIs, if you have high
number of incoming queries then you can add additional ENIs to handle the threshold. You can add up to 6 ENIs for an inbound resolver.
Follow the below steps for implementing this design
Inbound Resolver
As the name says inbound (DNS Resolutions coming in) which will enable your resources in the on-prem network to resolve AWS resource domain names or records in a Route 53 private hosted zone by allowing your on-prem network DNS resolvers to forward queries to Route 53 Resolver.Outbound Resolver
As the name says Outbound (DNS Resolutions going out) which will enable your AWS resources to resolve the domain names of your on-prem network resources using resolver rules, which would forward selected queries to the on-prem network DNS resolversOn-prem to AWS DNS Resolution for Multi Account Organization Setup
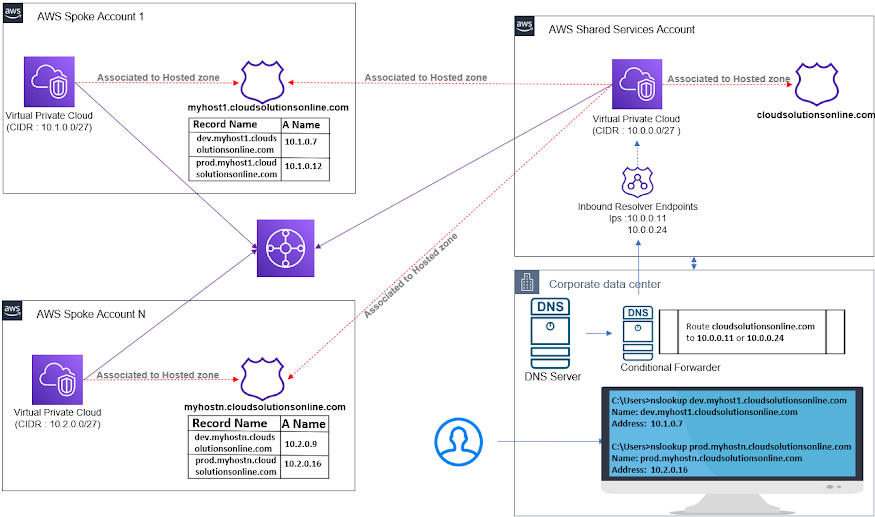
In this blog, I will be explaining on how the DNS resolutions can be configured in a multi account organization setup. When we have a requirement to enable DNS query from On-premises to AWS Multi account organization with a cost effective solution then below design is the right one to choose.
Pre-Requisites
- Ensure that there's network connectivity between your on-prem network and AWS via a VPN connection or Direct Connect.
- Enable DNS host names and resolutions in the DNS support attributes in the VPC in which you would create the endpoint.
-
For the inbound endpoint, you would need a security group with inbound rules that allow incoming traffic from the on-prem network IP addresses via the following port:
TCP/UDP 53
Architecture Workflow
When we have multi account Organization setup then each cloud consumers in your Organization will use a dedicated AWS account to deploy the workloads. As a platform engineering team, we have to ensure the account
provided to cloud consumers adhere to security and compliance framework and also we have to design a cost effective solutions.
In this blog, I will explain on how the DNS resolution can be made from on-premises to AWS Cloud using single Inbound Resolver. We know Route53 Resolver is an expensive service and just to host the service with few
queries, you will cost around 186.50 USD assuming 2 ENIs and 10 million DNS query per month.
Follow the below steps for implementing this design
Step 1: Create an Inbound Resolver in Shared Services Account
Login to Shared Services Account and navigate to Route53 service and create Inbound endpoints. As per the requirement, add IP Address between 2 to 6. Once we create the inbound endpoints, we get the IP Address from
the given subnets, In my case, I got allocated with10.0.0.11 and 10.0.0.24 IP addresses.
Step 2: Create a hosted zone for your domain
In Shared Services Account, navigate to Route 53 console and from the Hosted zone service create private hosted zone. In this example, I taken cloudsolutionsonline.com as my domain name in the hosted zone. As per
your requirement, enter the domain that you want to route traffic for. Choose the Private hosted zone and select your VPC and create hosted zone.
Step 3: Create a hosted zone for your domain in spoke accounts
In spoke accounts, create a hosted zone with your desired name + your domain name which we created in the Step 2. So in my case, I created a hosted zone with name myhost1.cloudsolutionsonline.com,
myhostn.cloudsolutionsonline.com respectively into multiple spoke accounts
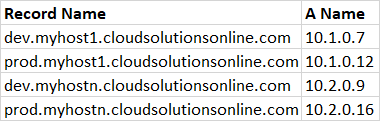
Step 4: Create a records inside the hosted zone in spoke accounts
In Spoke accounts, from the created hosted zone, one can start creating the records for your applications or servers. To simplify in this example, I created few 'A' records to route to my respective server IPs. Below
is my consolidated records in the spoke account hosted zones
Step 5: Authorize and Associate Shared Services VPC to the spoke hosted zones
While create the hosted zone, we associate its specific VPCs to the hosted zone, like spoke 1 VPC will be associated to spoke 1 hosted zone. Now, we have to associate Shared services account VPC to all spoke hosted zone via
AWS CLI or SDK, currently cross account VPC and hosted zone association is not possible from the AWS console.
Run the below AWS CLI command to create the authorization and association
From Spoke Accounts:
aws route53 create-vpc-association-authorization --hosted-zone-id <hosted-zone-id> --vpc VPCRegion=<region>,VPCId=<vpc-id> --region <region>
From Shared Services Account:
aws route53 associate-vpc-with-hosted-zone --hosted-zone-id <hosted-zone-id> --vpc VPCRegion=<region>,VPCId=<vpc-id> --region <region>
For more details, checkout the AWS documentation for authorization and association
Thank you for reading!
Step 6: Create a conditional Forwarder in the on-prem DNS server
In On-prem DNS server, create a condition forwarder in the DNS server to route your hosted zone domain to Inbound endpoints. In my case, I will route cloudsolutionsonline.com to 10.0.0.11 or 10.0.0.24From on-premises network, when we run nslookup or dig to the cloud records which we created, it gets resolved to the respective cloud servers.
Conclusion
In this blog post, I have shown you on how to configure DNS resolution from on-premises DNS to the records which we create in the spoke accounts in a cost effective way. Hope this blog helped you in your similar use case.Thank you for reading!
Comments
Post a Comment