Install SSM Agent in Amazon EC2 Instance
What is SSM Agent
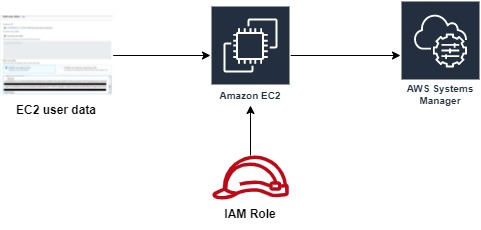
AWS Systems Manager Agent is a Amazon software which can be installed on Amazon EC2 Instances. If SSM Agent is Installed in the servers then it will be easy to manage the EC2 Instances through AWS Systems manager.
By default SSM agent is pre installed for below Amazon Machine Images
- Amazon Linux
- Amazon Linux 2
- Amazon Linux 2 ECS-Optimized Base AMIs
- macOS 10.14.x (Mojave), 10.15.x (Catalina), and 11.x (Big Sur)
- SUSE Linux Enterprise Server (SLES) 12 and 15
- Ubuntu Server 16.04, 18.04, and 20.04
- Windows Server 2008-2012 R2 AMIs published in November 2016 or later
- Windows Server 2016 and 2019
In this blog, I will walk you through on the ways to Install SSM Agent in the Instances which will not get SSM Agent by default.
Steps to Install SSM Agent on the New EC2 Instance
Step 1 : Create an IAM Instance profile Role
To create an IAM Instance profile, navigate to IAM service and click on Create Role and Select EC2 and click on Next


I choose t2.micro as an Instance type and in configure instance page, I will select the role which I created in first step

In Advanced Details, add the user data


In AWS management console, navigate to EC2 console and select the instance which you want to install ssm agent. Stop the instance. (To test this use case, I uninstalled the ssm agent manually and using the same EC2 as an Existing instance without ssm agent)

Once, instance is stopped. Select the Actions and choose Instance settings and select Edit user data. Copy the respective user data script and paste it in user data. For this demo, I am using RHEL 8 Instance, hence using RHEL 8 user data. Save and start the EC2 instance


Once Instance is Up and running, connect to the EC2 instance via Session Manager to confirm the instance is managed via Systems manager.
Select AmazonSSMFullAccess managed policy
You can optionally provide the tags and go to review and provide the name for the role and click on Create role
Step 2 : Launch the EC2 Instance
As I mentioned above, most of the Amazon Machine Images by default have SSM agent pre installed. For this demo, I will launch RHEL 8 Image.
Navigate to EC2 Dashboard, click on Launch Instances
Select the RHEL 8 AMI
I choose t2.micro as an Instance type and in configure instance page, I will select the role which I created in first step
In Advanced Details, add the user data
I have provided the user data script for various Linux Distributions in following page and you can grab the user data and enter in the AWS console. Finish adding other parameters, such as storage, tags, and security groups and Launch the EC2 Instance.
Once the Instance is up, you will be able to see the Instance in Systems Manager and you can then easily manage the instance from Systems Manager. To check, Navigate to Systems Manager and select Fleet Manager in left pane.
Also, we will be able to connect to instance from Session manager
Steps to Install SSM Agent on the Existing EC2 Instance
Things that you should know before to proceed to this topic
- Instance Profile Role should be attached, if not follow the Step 1 for creating the role and attach the role by selecting the instance, and click on Actions and select Security and click Modify IAM Role and from the drop down select the role and save
- This procedure will requires start and stop of your instance. Hence, please keep in mind that data in instance store volumes will be lost. Make sure that you backup any data on the instance store volume that you want to keep
- Stopping and starting the instance changes the public IP address of the instance. Its a best practice to use an Elastic IP address instead of a public IP address when routing external traffic to your instance
Follow the Below Steps
Once Instance is Up and running, connect to the EC2 instance via Session Manager to confirm the instance is managed via Systems manager.
User Data Scripts for various Linux Distributions
Amazon Linux 2, RHEL 7, and CentOS 7 (64 bit)
RHEL 8 and CentOS 8#!/bin/bashcd /tmpsudo yum install -y https://s3.amazonaws.com/ec2-downloads-windows/SSMAgent/latest/linux_amd64/amazon-ssm-agent.rpmsudo systemctl enable amazon-ssm-agentsudo systemctl start amazon-ssm-agent
#!/bin/bashcd /tmpsudo dnf install -y https://s3.amazonaws.com/ec2-downloads-windows/SSMAgent/latest/linux_amd64/amazon-ssm-agent.rpmsudo systemctl enable amazon-ssm-agentsudo systemctl start amazon-ssm-agent
Note: Python must be installed on your RHEL 8 or CentOS 8 instance for SSM Agent to work correctly. To verify that Python is installed, add the following command to the preceding command examples:
sudo dnf install python3
Amazon Linux, CentOS 6 (64 bit)
#!/bin/bashcd /tmpsudo yum install -y https://s3.amazonaws.com/ec2-downloads-windows/SSMAgent/latest/linux_amd64/amazon-ssm-agent.rpmsudo start amazon-ssm-agent
Ubuntu 16 (Deb Installer), Debian 8 and 9
#!/bin/bashmkdir /tmp/ssmcd /tmp/ssmwget https://s3.amazonaws.com/ec2-downloads-windows/SSMAgent/latest/debian_amd64/amazon-ssm-agent.debsudo dpkg -i amazon-ssm-agent.debsudo systemctl enable amazon-ssm-agent
Ubuntu 14 (Deb installer)
Thank you for reading!
#!/bin/bashmkdir /tmp/ssmcd /tmp/ssmwget https://s3.amazonaws.com/ec2-downloads-windows/SSMAgent/latest/debian_amd64/amazon-ssm-agent.debsudo dpkg -i amazon-ssm-agent.debsudo start amazon-ssm-agent
Suse 12
#!/bin/bashmkdir /tmp/ssmcd /tmp/ssmwget https://s3.amazonaws.com/ec2-downloads-windows/SSMAgent/latest/linux_amd64/amazon-ssm-agent.rpmsudo rpm --install amazon-ssm-agent.rpmsudo systemctl enable amazon-ssm-agentsudo systemctl start amazon-ssm-agent
Conclusion
In this blog post, I have shown you how to install the SSM agent on the new and existing Linux EC2 Instance to manage the instance through Systems Manager. Also for your reference, I have provided you the user data scripts for various Linux distributions. Hope this blog helped you in your similar use case.Thank you for reading!
Comments
Post a Comment